Updated a WordPress page but still seeing the old version? Follow these practical steps to check browser, plugin, hosting, and CDN caching, verify your homepage settings, and troubleshoot theme or plugin conflicts.
WordPress Changes Not Showing? 9 Ways to Fix It
Have you edited a WordPress page, changed your website design, updated a heading, or published new content, only to discover that the live website still displays the old version? This is a common and frustrating problem for website owners.
In many cases, your changes have been saved correctly, but a browser, WordPress caching plugin, hosting cache, or content delivery network (CDN) is still serving an older version of the page. However, caching is not the only possible cause. You might also be editing the wrong page, viewing a different URL, or dealing with a theme or plugin conflict.
The good news is that you can investigate these problems systematically without immediately reinstalling WordPress or changing your website files.
In this guide, you will learn how to fix WordPress changes not showing, check whether your edits were saved, clear the appropriate caches, and identify when you need further technical support.
Why Are WordPress Changes Not Showing?
WordPress websites can use several layers of caching to improve loading speed. Your browser might store website resources locally, a WordPress plugin might save generated pages, and your hosting provider or CDN might cache content before delivering it to visitors.
When you make an update, one of these layers may continue serving an older version.
Other possible causes include:
- Changes were not saved or published.
- You edited a different page from the one displayed on the homepage.
- The wrong homepage is selected in WordPress settings.
- A page builder or theme has generated outdated content or styles.
- A plugin conflict prevents the expected changes from appearing.
- Your browser is displaying an older stylesheet or image.
WordPress.org documents browser caching, server side caching, caching plugins, and checking the correct file or location as important troubleshooting steps. Read the official WordPress troubleshooting guide.
1. Confirm That Your Changes Were Saved
Before clearing caches or changing technical settings, make sure WordPress actually saved your edits.
Follow these steps:
- Sign in to your WordPress dashboard.
- Open Pages → All Pages or Posts → All Posts, depending on what you edited.
- Open the relevant page or post.
- Check that your new text, image, heading, or design adjustment is present in the editor.
- If the page has unsaved changes, save or update it.
- Open the published page using its public URL in a new browser tab.
If you edited a draft, remember that visitors may still see the previous published version until you publish your changes.
Also check whether you edited the correct page. For example, changing a page named “Home” will not necessarily change the page visitors see if WordPress is displaying a different page as the homepage.
Tip: Copy the public URL of the page you edited. Use that exact URL throughout your troubleshooting process.
2. Open Your Website in a Private Browser Window
Your browser can store previously downloaded website resources to reduce loading times. Sometimes, this cached information makes it appear that your website has not updated.
The quickest test is to open your website in a private or incognito window.
In Google Chrome:
- Open the browser menu.
- Select New Incognito Window.
- Enter the full URL of your updated page.
- Check whether your latest changes are visible.
You can also try a hard refresh on Windows by pressing Ctrl + F5. On many Mac browsers, Command + Shift + R forces a reload.
If the updated page appears in the private window but not in your normal browser, the browser cache is a likely cause.
You can clear cached images and files through your browser’s privacy settings. Be careful when selecting what to delete, because clearing all browsing data may also remove other stored information.
If the page still displays old content in a private window, continue to the next step.
3. Clear Your WordPress Caching Plugin
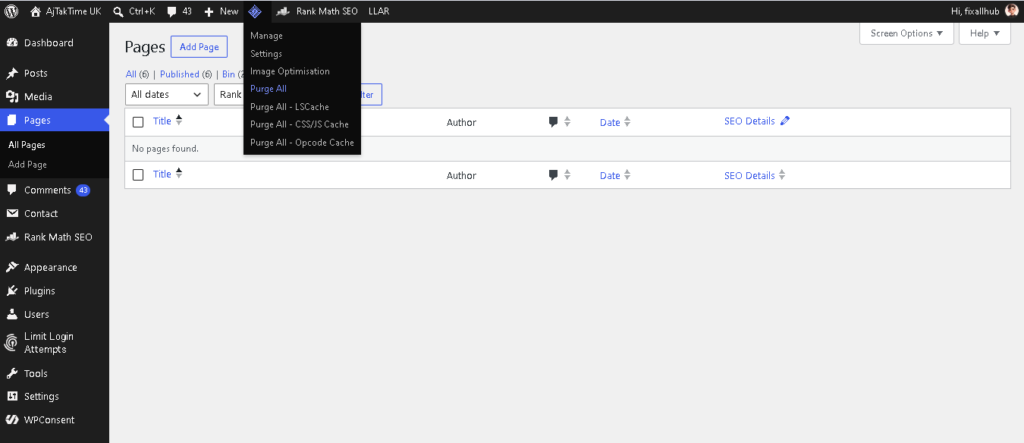
Many WordPress websites use caching plugins to improve performance. These plugins may store ready made page copies, optimized stylesheets, scripts, and other resources.
When you update a page, an older cached version may remain available until the cache is cleared or automatically refreshed.
To investigate:
- Open Plugins → Installed Plugins in your WordPress dashboard.
- Identify the caching or performance plugin installed on your website.
- Open its settings or use the cache clearing option available in the dashboard.
- Select the appropriate option to clear or purge the cache.
- Reopen your public page and check the result.
The exact button name depends on the plugin. It might be called “Purge Cache,” “Clear Cache,” or something similar.
Do not install another caching plugin simply because the existing one appears not to work. Multiple caching systems can make troubleshooting more complicated.
If your website uses a page builder or a plugin that generates CSS files, check whether it provides an option to regenerate those files. Follow the plugin’s documentation before changing advanced settings.
4. Check Your Hosting Provider’s Cache
Clearing your WordPress plugin cache does not necessarily clear every cache used by your hosting provider.
Some hosting environments have server side caching that operates independently of WordPress. This means the hosting server may continue delivering an older page even after you clear your plugin cache.
If your website is hosted on Hostinger, sign in to your hosting account and look for the website performance or caching controls available for your specific hosting plan.
If a cache management option is available, use it to clear the relevant cache. The exact interface and available features can vary.
Then reopen the page in a private browser window.
If you cannot find a cache control, contact your hosting provider and ask whether server side caching is enabled and how to purge it for your domain.
Important: Do not delete website files or change server configuration just to force an update. First establish which caching layer is responsible.
5. Purge Your CDN Cache
A content delivery network, or CDN, can cache website resources and deliver them from servers closer to visitors.
If your website uses a service such as Cloudflare, it may have its own cache separate from WordPress and your hosting provider.
Here is how to investigate:
- Sign in to your CDN account.
- Select the correct website or domain.
- Find its caching settings.
- Purge the relevant cached content, if appropriate.
- Revisit your updated page.
Whenever possible, purge only the affected URL or resources rather than clearing everything. A full cache purge can temporarily increase requests to your origin server while cached resources are regenerated.
If your site does not use a CDN, skip this step.
If the problem continues after clearing the browser, WordPress, hosting, and CDN caches that actually apply to your website, investigate the page settings and design system next.
6. Check Your WordPress Homepage Settings
This step is particularly important when you have updated your homepage but the public website still displays old content.
WordPress can display either your latest posts or a specific static page as the homepage. Editing a page does not automatically make it the homepage.
To verify the configuration:
- Open your WordPress dashboard.
- Go to Settings → Reading.
- Find the section for displaying your homepage.
- Check whether it is configured to show your latest posts or a static page.
- If a static page is selected, verify that the correct page is assigned as the homepage.
- Save any necessary changes and check the public website again.
If you use a theme or page builder that provides a separate homepage template, also check its documentation and settings.
For example, you might edit a page called “Home” while the website is actually displaying a different page or a custom template.
Do not change the homepage selection unless you have confirmed that it is incorrect. Accidentally selecting the wrong page can change what visitors see across your website.
7. Check Whether Your CSS or Design Changes Are Being Cached
Sometimes the text on a page updates correctly, but changes to fonts, colours, spacing, or layout do not appear.
This often points to a stylesheet or generated CSS issue rather than an ordinary content problem.
Try the following checks:
- Confirm that you saved the CSS or design changes.
- Hard refresh the affected page.
- Clear any applicable WordPress, hosting, and CDN caches.
- If you use a page builder, check whether it offers a CSS regeneration or asset rebuilding option.
- Inspect the page in another browser to determine whether the issue is browser specific.
If you added custom CSS through Appearance → Customize → Additional CSS, verify that you used the correct selector and that the changes were published.
If you edited a theme stylesheet directly, confirm that you changed the file actually loaded by the live website. Editing a parent theme when the active site uses a child theme, or editing a different installation, can produce confusing results.
Avoid editing WordPress core files. Keep a backup before making changes to theme files, and use a child theme or another maintainable method for customizations when appropriate.
8. Investigate Plugin or Theme Conflicts
If your changes still do not appear, a plugin or theme conflict may be involved.
WordPress.org recommends troubleshooting by disabling plugins and testing with a default WordPress theme when appropriate. However, doing this directly on a live website can affect its functionality and appearance.
A safer approach is to use a staging website or a supported troubleshooting mode.
Follow this process:
- Back up your website.
- If available, create a staging copy.
- Test the issue on the staging site.
- Temporarily disable plugins in a controlled manner.
- Check whether the problem disappears.
- Reactivate plugins one at a time and retest.
- If needed, test with a default WordPress theme.
- Identify the component associated with the problem before making permanent changes.
The official WordPress Troubleshooting plugin provides a troubleshooting mode designed to help test plugins and themes without changing what ordinary visitors see.
Do not deactivate essential plugins on a live business website without considering the impact. A plugin may control contact forms, payments, security, backups, or other important functions.
If the problem remains after the relevant plugins and theme have been investigated, contact your hosting provider or a qualified WordPress developer.
9. Check the URL and the Actual Page Being Served
If none of the previous steps resolves the problem, make sure the browser is loading the correct page.
Check the following:
- The domain is correct, including whether the site uses HTTPS.
- You are not switching between the www and non www versions of the domain.
- You are viewing the correct page path.
- The page is not redirecting to an older URL.
- Your website does not have separate staging and production installations.
- You are editing the same WordPress installation that serves the public website.
For a more technical investigation, a developer can inspect the page source, network requests, response headers, and server logs to identify whether the old content is coming from a cached response, a different template, or another source.
If you suspect that the server is serving a different file, follow the official WordPress guide to changes that do not appear.
Avoid deleting files or changing database records without identifying the underlying problem first.
What If WordPress Changes Still Do Not Appear?
If the problem persists after these checks, collect a few details before seeking help.
Record:
- The URL of the affected page.
- What you changed.
- Whether the editor shows the new version.
- Whether the problem occurs in a private browser window.
- Which caching plugin, hosting cache, or CDN your website uses.
- Whether the issue affects one page or the entire website.
- Any error messages that appear.
These details help distinguish a caching issue from an incorrect homepage setting, a design problem, or a more technical server issue.
If you need assistance from your hosting provider, explain the tests you have already performed. Ask them to check the server cache and confirm that the correct website installation is serving the affected URL.
Frequently Asked Questions
Why are my WordPress changes not showing on my live website?
Common causes include browser caching, WordPress caching plugins, hosting cache, CDN caching, unsaved edits, incorrect page settings, and theme or plugin conflicts. Start by checking that the changes were saved, then test the public page in a private browser window.
How do I force WordPress to show the latest changes?
First, save or publish your edits. Then clear the relevant browser and website caches. If your hosting provider or CDN uses additional caching, purge those caches as well. The exact steps depend on your website setup.
Why is my WordPress homepage not updating?
Check Settings → Reading to confirm which page is assigned as the homepage. If the correct page is selected, investigate the theme or page builder settings and clear any applicable caches.
Why are my WordPress CSS changes not showing?
The browser may be using an older stylesheet, or a caching plugin or page builder may be serving generated CSS from before your changes. Clear the relevant caches and regenerate CSS files if your builder provides that option.
Will clearing the WordPress cache delete my website content?
Clearing a normal page cache should remove cached copies rather than delete your published posts and pages. However, the effect depends on the tool and option you select. Check the plugin or hosting documentation before using unfamiliar controls.
Should I disable all WordPress plugins to fix the issue?
Not as your first step. Begin with cache clearing and checking your page settings. If a conflict is suspected, use a staging website or troubleshooting mode when available so you can test safely.
How long does it take for WordPress changes to appear?
Changes often appear after the relevant caches are refreshed, but the time depends on your website configuration. If the update remains missing after checking the applicable caches, investigate the page settings, theme, plugins, and server response rather than waiting indefinitely.
Final Thoughts
When WordPress changes are not showing on your live website, start with the simplest explanations before making risky technical changes.
Confirm that your edits were saved, test the page in a private browser window, and clear the caches used by your WordPress installation, hosting provider, or CDN. If that does not work, check your homepage settings, stylesheets, plugins, theme, and the URL being served.
Work through one step at a time and retest after each change. This makes it easier to identify the actual cause and reduces the risk of creating additional problems.
If you manage a WordPress website regularly, keeping backups and documenting your hosting and caching setup can make future troubleshooting much easier.
Editorial note: The troubleshooting steps are general guidance. The exact controls depend on your WordPress theme, plugins, hosting provider, and CDN configuration. Always back up your website before making significant technical changes.